Blades are one of the most important parts of your vinyl cutter/plotter. Whether you have a ‘Craft Cutter’ or ‘Wide Format Cutter’, cheap or expensive, new or used, your cutter is only as good as the blade doing the cutting. So it’s important to understand which blades should be used for each material and how to install and maintain them properly.
Which Blade Angle Should I Use?
The 2 most common blade angles are 45˚ and 60˚. There are other angles available for more specific or specialty materials, like the Flock Blade and Twill Blade, but the majority of vinyls cut best with a 45˚ or 60˚ blade.
Here is a short video from our friends at Roland DGA to help explain the differences and benefits of the 45˚ and 60˚ blades.
VIDEO ‘Pro Tips – Things To Know About Cutter Blades’
- 45˚ Blade
This is your ‘all-purpose’, general use blade. This will cut most materials up to 4 Mil or 101 Microns thick, whether it’s Heat Transfer Film or Sign Vinyl. This type of blade is included with most new cutters. - 60˚ Blade
The steeper angle of this blade is ideal for thicker materials (4 Mil and up), or for cutting detailed designs. Having at least one 60˚ blade on-hand is a good idea because you never know when the 45˚ won’t cut it (pun intended). - Flock Blade
As the names implies, this blade is specifically for use with Flock Heat Transfer material. The steep, curved angle allows it to glide easily through the fuzzy face of the material and cleanly cut the solid adhesive backing. - Twill Blade
This blade is ideal for cutting Heat Transfer Tackle Twill fabric. The chiseled edge helps prevent the fabric from fraying, giving you a smooth, clean cut. (Note: The Twill blades referred to here are for roll fed cutters and require a plastic backing/carrier. The Pressure Sensitive Twill comes with a plastic carrier, but the Poly-Twill and Bulk Poly Twill do not. Ioline Poly Twill and Bulk Poly Twill need to be cut on a flatbed cutter like the Ioline 300, or attached to Magic Mask to be used on a roll fed cutter.)
So no matter what material or design you are cutting, picking the right blade will ensure you get a quality cut.
What is ‘Offset’ and Why Change It?
Offset is the measurement that determines the blade’s turning radius and compensation for distance while turning corners. What does that mean? Take a look at the diagram below:
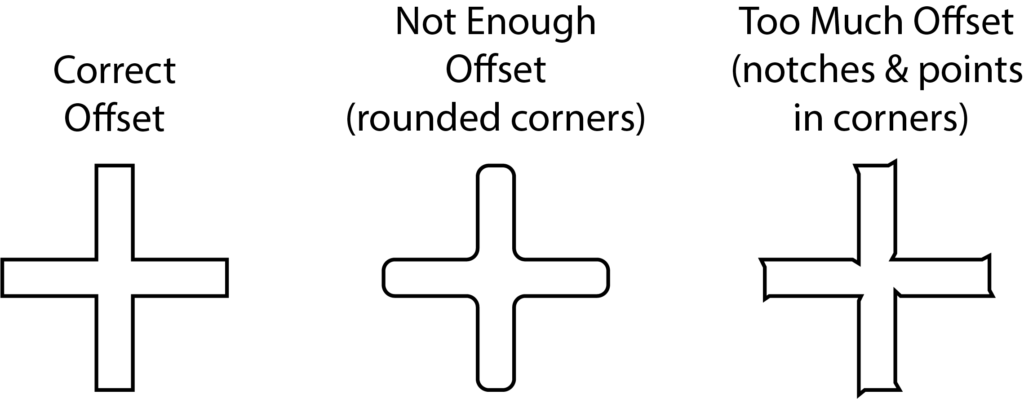
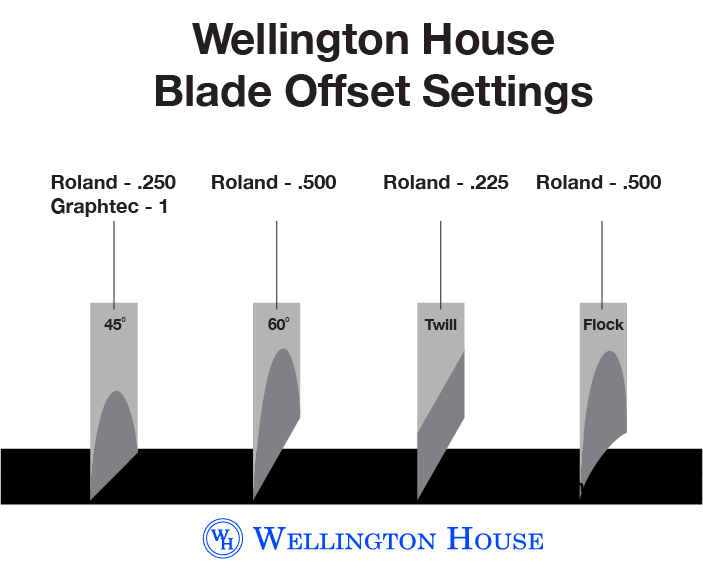
The first example on the left is what you test-cut or design corners should look like. If they look more like one of the others, you need to adjust your offset. Each blade manufacturer has their own recommended offsets, so check with them to find the correct setting for your blade. (See diagram below for offsets on Roland and Graphtec cutters)
Blade Extension – How Much Is Too Much?
Blade extension is an adjustment that seems like a minor detail, but it’s actually rather important to ensure proper cutting and to extend the life of your blades (which saves you time and money). It’s also an area that most people get wrong at first.
For most people, the assumption is ‘more is better’, so the blade gets extended too far out from the blade holder. And honestly the results in your cut graphics may be fine. But you may be putting extra wear-n-tear on your equipment, resulting in replacing parts more often than you would normally have to. So what is the optimal blade extension?
A good rule of thumb or point of reference is having the tip of the blade exposed half the thickness of a credit card. For some, this may mean you can hardly see the blade tip. But that’s ok, because you’re going to do some test cuts to make sure you have enough blade exposed.

You can do a test cut by hand (holding the blade holder in your hand and dragging it across a piece of vinyl to make a square). If the blade has proper exposure, you should be able to cleanly weed the test cut piece. You can also just install the blade holder into your cutter, adjust the cutting force to the lower end, and select the test cut function. Keep increasing the force until you achieve a clean cut, or if the force reaches the higher end and you’re still not getting a clean cut, then you may need to increase the exposure a little more. But remember the ‘less is more’ rule so you don’t expose too much.
The only time more blade exposure is recommended is when cutting thicker materials.
Summary
So what are the main points to take away from this?
- The 45˚ angle blade is the most commonly used and great for cutting most vinyls, but switch to a different angle if you’re cutting specialty material.
- When you do switch to a different angle blade, change the offset setting.
- Check the extension of your blade and if you can barely see the tip, it’s probably the correct exposure.
For more info or if you have any questions, call or email our cutting professionals: